Become an Instructor on Madarsa — Build Courses, Run Live Classes, and Mentor Students
مدرسہ پر استاد بنیں — کورس بنائیں، لائیو کلاسز چلائیں، اور طلباء کی رہنمائی کریں

Imranul Haque Noor
An Engineer, an all time Learner and a Learning enabler.
👨🏫 Become an Instructor on Madarsa
A complete guide for teachers, students-of-knowledge, and professionals who want to publish courses on Madarsa — applying, building courses, running live classes, offering 1:1 mentorship, and getting paid. With real screenshots from every screen.
اردو ترجمہ — Urdu Translation
یہ گائیڈ کس کے لیے ہے؟ — اگر آپ ایک استاد (Teacher)، عالم، یا کسی شعبے کے ماہر (Professional) ہیں اور مدرسہ (Madarsa) پر کورس شائع کرنا چاہتے ہیں، لائیو کلاسز (Live Classes) چلانا چاہتے ہیں، یا ایک ٹو ون مینٹرشپ (1:1 Mentorship) دینا چاہتے ہیں — تو یہ مضمون آپ کے لیے ہے۔ ہر قدم کی اصل اسکرین شاٹس اور اردو ترجمہ ساتھ ہے۔
کوئی پروگرامنگ یا ٹیکنیکل علم درکار نہیں۔ صرف اپنا مواد (Content)، شیڈول، اور ادائیگی کے لیے بینک تفصیلات (Bank Details) چاہئیں۔
🌟 Why teach on Madarsa
🌍 Reach Urdu-Hindi-English learners
Bilingual built-in. Your course can have Urdu translations of every lesson without you re-writing it twice.
💰 Set your own price
Free, paid, or coupon-driven. Founder pricing is encouraged but you control the numbers.
🎥 Multiple formats
Text, video, audio, PDF, quizzes, live LiveKit classes, and 1:1 mentorship — all in one platform.
📊 Real analytics
See enrolments, completion rates, revenue, and student feedback inside the instructor dashboard.
اردو ترجمہ — Urdu Translation
مدرسہ پر پڑھانے کا فائدہ کیا ہے؟
- اردو، ہندی اور انگریزی طلباء تک رسائی: دو لسانی (Bilingual) سپورٹ پہلے سے بنی ہوئی ہے — ہر لیسن کے ساتھ اردو ترجمہ شامل کر سکتے ہیں، الگ سے دو بار نہ لکھنا پڑے۔
- اپنی قیمت خود طے کریں: مفت، ادا شدہ یا کوپن (Coupon) کے ساتھ — قیمت آپ کے ہاتھ میں۔ بانی قیمت (Founder Pricing) کی حوصلہ افزائی کی جاتی ہے، فیصلہ آپ کا۔
- متعدد فارمیٹس: متن (Text)، ویڈیو (Video)، آڈیو (Audio)، پی ڈی ایف (PDF)، کوئز (Quiz)، لائیو کلاسز (Live Classes ذریعہ LiveKit)، اور ون آن ون مینٹرشپ — سب ایک ہی پلیٹ فارم پر۔
- اصل تجزیات (Analytics): داخلے، کورس مکمل ہونے کا تناسب، آمدنی اور طلباء کا فیڈ بیک — سب انسٹرکٹر ڈیش بورڈ (Instructor Dashboard) میں۔
🪜 Step 1 — Apply to become an instructor
Sign up as a normal student first (see the student signup guide). Once signed in, click the profile dropdown and choose Become an Instructor, or visit /become-instructor directly.
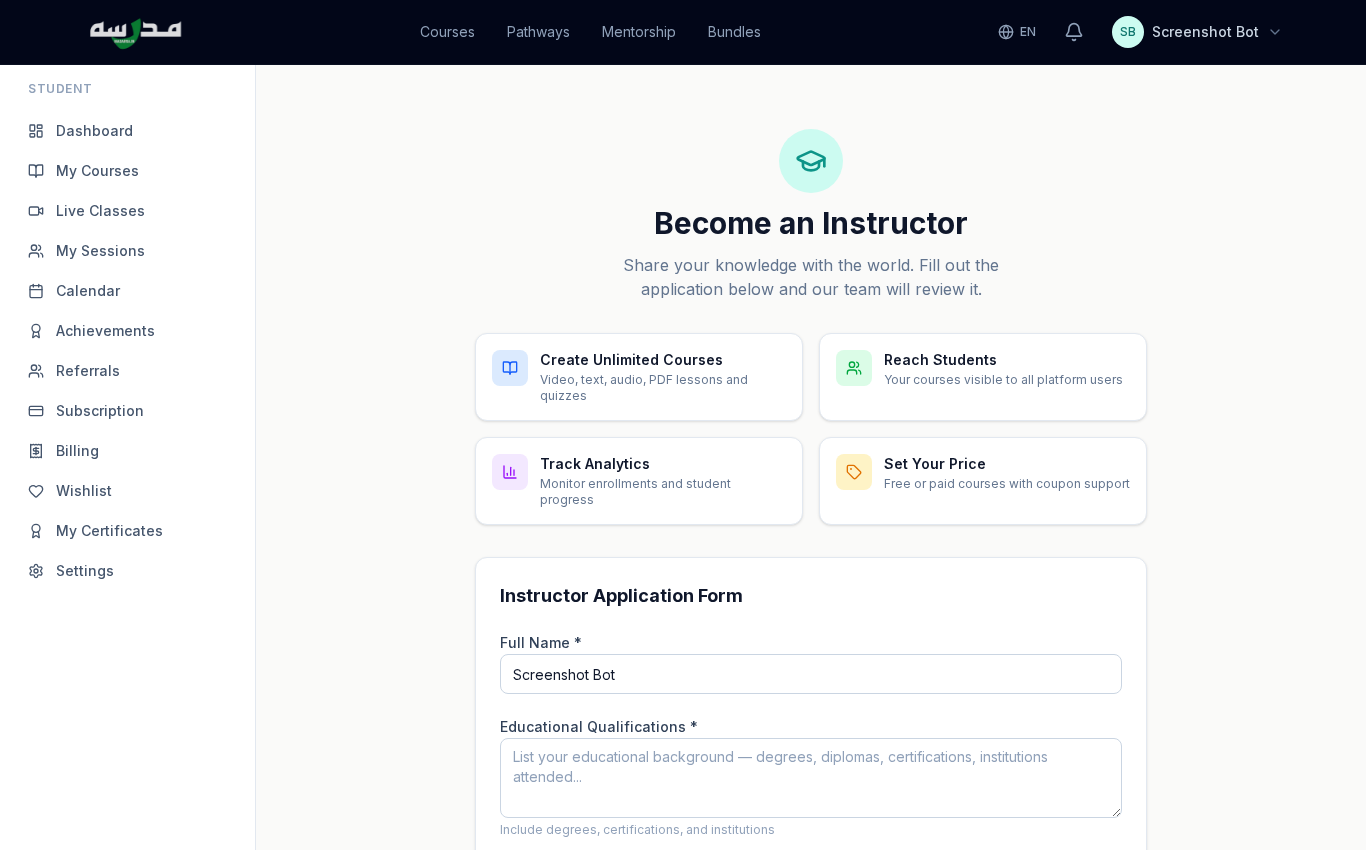
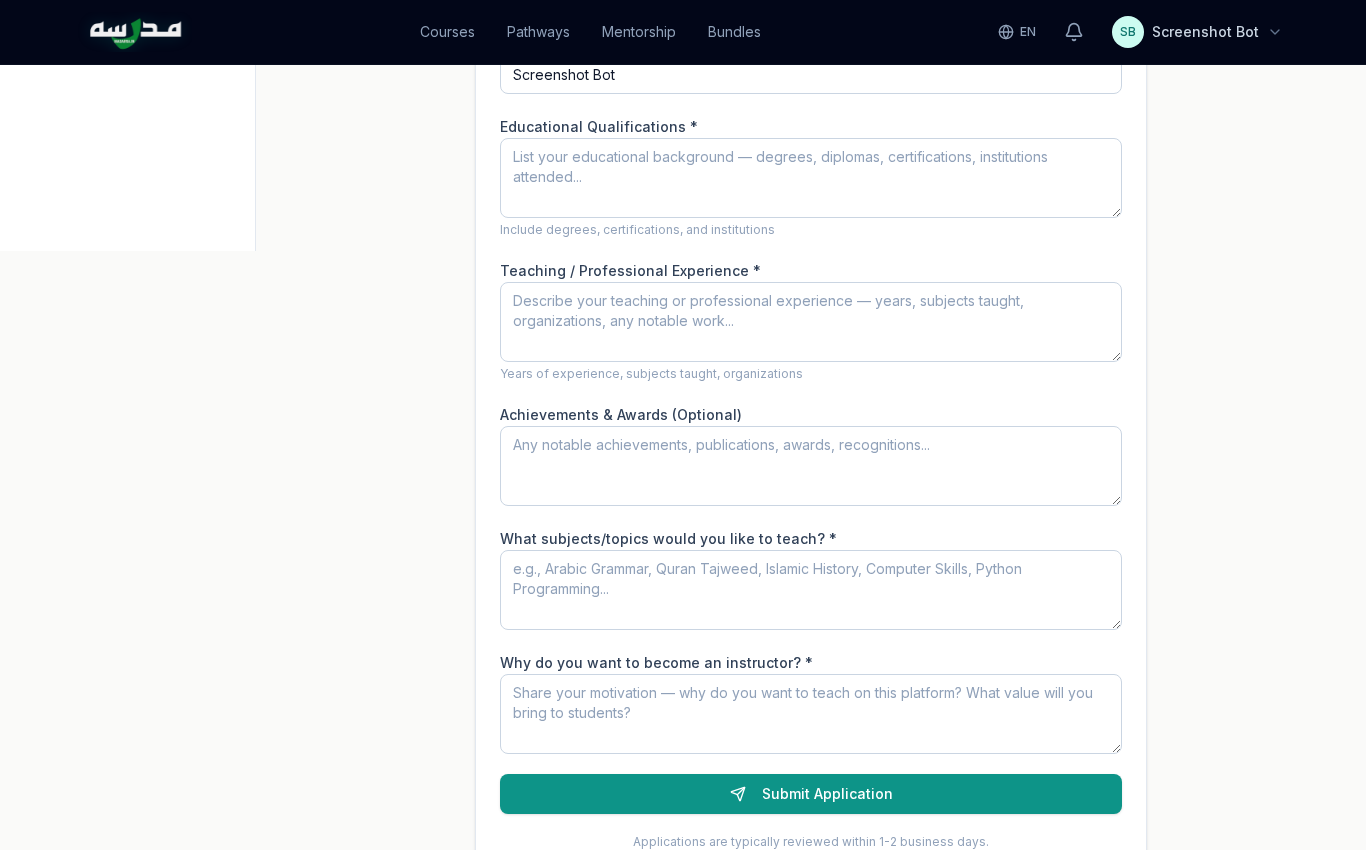
The page first shows what instructors get on the platform — unlimited course creation, platform-wide reach, analytics, and price control. Scroll down to find the application form:
اردو ترجمہ — Urdu Translation
پہلا قدم — استاد بننے کی درخواست (Application): پہلے عام طالب علم کے طور پر سائن اَپ کریں (نیچے طالب علم گائیڈ دیکھ لیں)۔ سائن اِن ہونے کے بعد اوپر اپنی پروفائل (Profile) ڈراپ ڈاؤن (Dropdown) سے Become an Instructor چنیں — یا براہ راست /become-instructor پر جائیں۔
یہ صفحہ پہلے بتاتا ہے کہ استاد کو پلیٹ فارم پر کیا ملتا ہے — لامحدود کورس تخلیق (Unlimited Course Creation)، طلباء تک رسائی (Reach Students)، تجزیات (Analytics) اور قیمت کا کنٹرول (Price Control)۔ نیچے درخواست فارم (Application Form) ہے۔
The form asks for five things:
- Educational Qualifications — degrees, diplomas, certifications, institutions attended.
- Teaching / Professional Experience — years, subjects taught, organisations.
- Achievements & Awards (optional) — publications, awards, recognitions.
- Subjects / Topics you'll teach — e.g. Arabic Grammar, Quran Tajweed, Computer Skills, Python Programming.
- Why you want to teach on Madarsa — your motivation and the value you'll bring.
Be specific. "Taught Tajweed at the local madrasa for 6 years" is better than "experienced teacher". Admin reviews each application personally; specifics speed up approval.
اردو ترجمہ — Urdu Translation
یہ فارم پانچ چیزیں پوچھتا ہے:
- تعلیمی قابلیت (Educational Qualifications): ڈگریاں، ڈپلوما، سرٹیفکیشنز، ادارے۔
- پڑھانے / پیشہ ورانہ تجربہ (Teaching/Professional Experience): برسوں کی تعداد، مضامین، ادارے۔
- اعزازات (Achievements & Awards): اختیاری — اشاعتیں، اعزاز، تسلیم۔
- کون سے مضامین پڑھانا چاہتے ہیں: مثلاً عربی گرامر، قرآن تجوید، کمپیوٹر مہارت، پائتھون پروگرامنگ۔
- وجہ — مدرسہ پر کیوں پڑھانا چاہتے ہیں: آپ کی تحریک اور وہ قدر جو آپ طلباء کے لیے لائیں گے۔
تجویز: مخصوص (Specific) لکھیں۔ "چھ سال تک محلے کے مدرسے میں تجوید پڑھائی" زیادہ مضبوط ہے بہ نسبت "تجربہ کار استاد"۔ ایڈمن (Admin) ہر درخواست خود پڑھتا ہے — تفصیل سے منظوری جلدی ملتی ہے۔
⏳ Step 2 — Wait for approval
Applications are reviewed within 1–2 business days. You'll receive an email when the decision is made. Three possible outcomes:
✅ Approved
Your role flips from student to instructor. The instructor sidebar appears.
❓ Clarification needed
Admin asks for more details (e.g. proof of experience). Just reply on the same form — it stays editable.
❌ Rejected
Doesn't happen often. Common reason: blank or one-line answers. Re-apply after editing.
اردو ترجمہ — Urdu Translation
دوسرا قدم — منظوری کا انتظار: درخواست عام طور پر ایک سے دو کاروباری دن (1–2 Business Days) میں دیکھی جاتی ہے۔ فیصلہ ہونے پر آپ کو ای میل ملتی ہے۔ تین ممکنہ نتائج:
- منظور (Approved): آپ کا کردار طالب علم سے بدل کر استاد (Instructor) ہو جاتا ہے، اور بائیں طرف انسٹرکٹر سائڈ بار (Sidebar) ظاہر ہو جاتا ہے۔
- مزید وضاحت درکار (Clarification Needed): ایڈمن مزید تفصیلات مانگتا ہے۔ اسی فارم پر جواب دیں — وہ قابل ترمیم رہتا ہے۔
- مسترد (Rejected): شاذ و نادر۔ زیادہ تر وجہ: خالی یا ایک سطر کے جوابات۔ بہتر کر کے دوبارہ درخواست دیں۔
📊 Step 3 — Tour the Instructor Dashboard
After approval, click Switch to Instructor Panel in the left sidebar (or visit /instructor) to enter your teaching workspace.
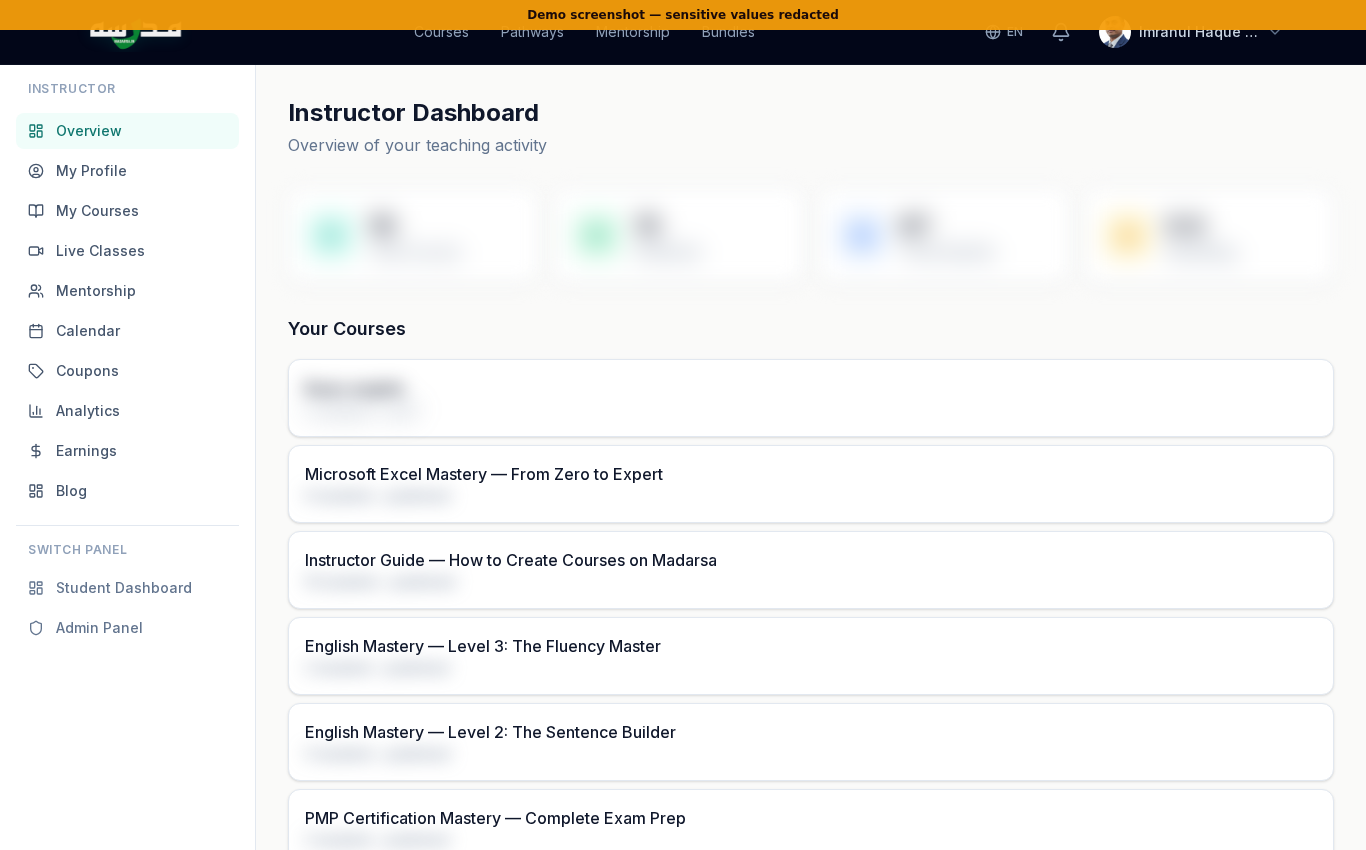
Top tiles show your overall stats — Total Courses, Published, Total Students, and Avg Rating. Below them is the list of your courses with student count and status (draft / review / published).
The left sidebar gives you quick access to every instructor feature:
- My Profile — your public-facing instructor page
- My Courses — create, edit, manage
- Live Classes — schedule LiveKit video sessions
- Mentorship — 1:1 booking, availability, packages, plans
- Calendar — every commitment in one view
- Coupons — your own coupon codes
- Analytics — engagement and revenue
- Earnings — payout history and bank details
- Blog — submit articles for the magazine
اردو ترجمہ — Urdu Translation
تیسرا قدم — انسٹرکٹر ڈیش بورڈ (Instructor Dashboard) دیکھیں: منظوری کے بعد بائیں سائڈ بار میں Switch to Instructor Panel پر کلک کریں — یا براہ راست /instructor پر جائیں۔
اوپر چار ٹائلز (Tiles) دکھاتی ہیں آپ کی مجموعی صورت حال: کل کورسز (Total Courses)، شائع شدہ (Published)، کل طلباء (Total Students) اور اوسط ریٹنگ (Avg Rating)۔ نیچے آپ کے کورسز کی فہرست ہر کورس میں طلباء کی تعداد اور حالت (Status) کے ساتھ — مسودہ (Draft)، جائزہ (Review) یا شائع شدہ (Published)۔
بائیں سائڈ بار سے ہر فیچر تک رسائی ہے: My Profile، My Courses، Live Classes، Mentorship، Calendar، Coupons، Analytics، Earnings، Blog۔
👤 Step 4 — Set up your instructor profile
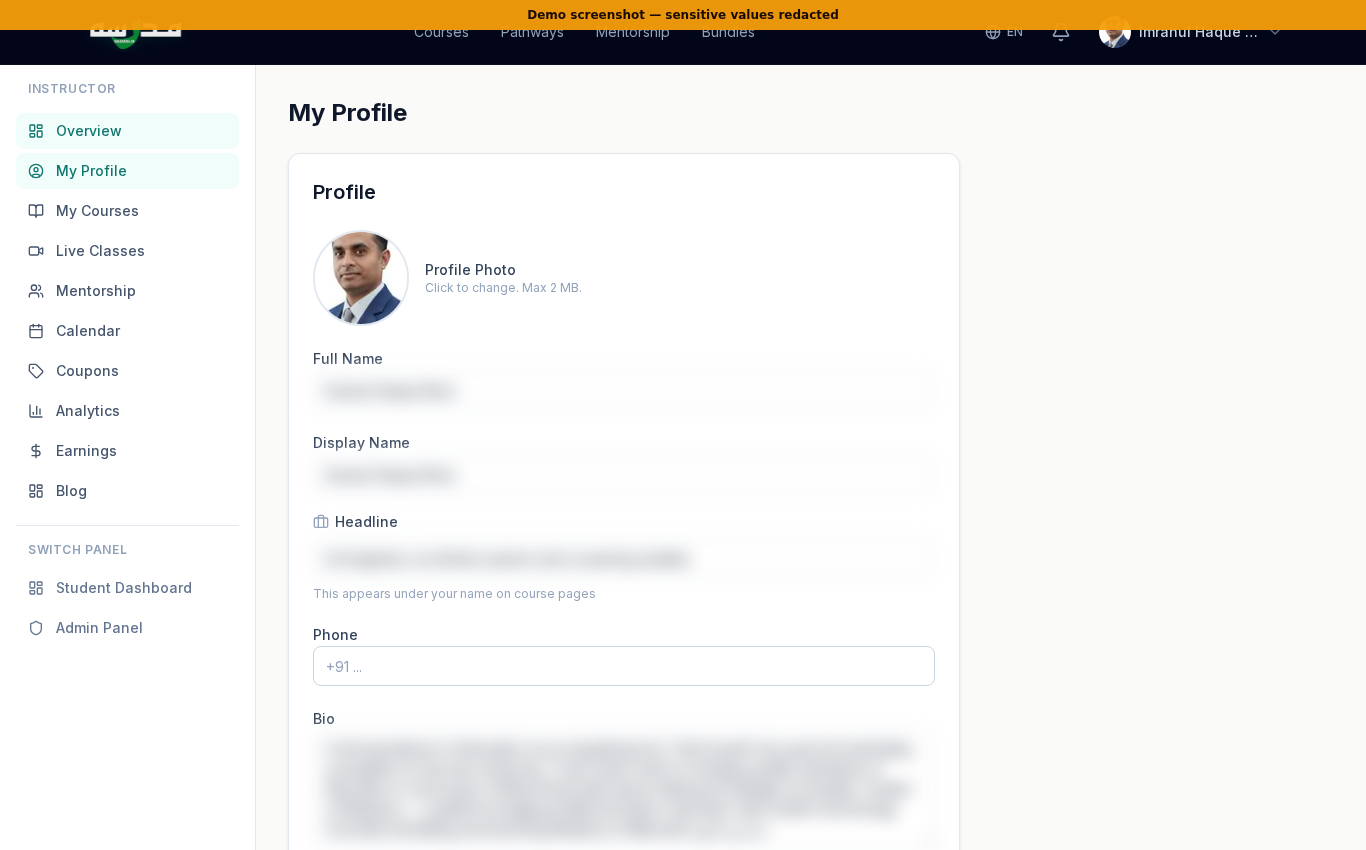
Your profile is the trust-builder. Spend 15 minutes here. The fields that matter most:
- Avatar — a clear face photo. No logos, no anime.
- Headline — one line, like "Hafiz al-Quran & CA Inter — teaching since 2018".
- Bio — three short paragraphs. Who you are, what you teach, why students should learn from you.
- Expertise tags — narrow subjects (e.g. Tajweed, Arabic Grammar, Excel Macros) so search and recommendations work.
- Social links — YouTube channel, LinkedIn, X — only the ones a student would actually visit.
اردو ترجمہ — Urdu Translation
چوتھا قدم — اپنا انسٹرکٹر پروفائل (Profile) ترتیب دیں: آپ کی پروفائل اعتماد قائم کرنے کا سب سے اہم ٹول ہے۔ یہاں ۱۵ منٹ خرچ کرنا قیمتی ہے۔ اہم فیلڈز:
- اواتار (Avatar): ایک واضح چہرے کی تصویر۔ لوگو یا اینیمی نہیں۔
- ہیڈ لائن (Headline): ایک سطر کا تعارف، جیسے "حافظ القرآن، سی اے انٹر — ۲۰۱۸ سے پڑھا رہا/رہی ہوں"۔
- بایو (Bio): تین مختصر پیراگراف — آپ کون ہیں، کیا پڑھاتے ہیں، طلباء کو کیوں آپ سے سیکھنا چاہیے۔
- مہارت کے ٹیگز (Expertise Tags): چھوٹے مخصوص مضامین جیسے تجوید، عربی گرامر، ایکسل میکروز — تاکہ سرچ (Search) اور تجاویز (Recommendations) آپ کو پہچان سکیں۔
- سوشل لنکس (Social Links): یوٹیوب چینل (YouTube Channel)، لنکڈ اِن (LinkedIn)، ایکس (X) — صرف وہی جن پر طلباء واقعی جائیں گے۔
📚 Step 5 — Build your first course
From the sidebar click My Courses.
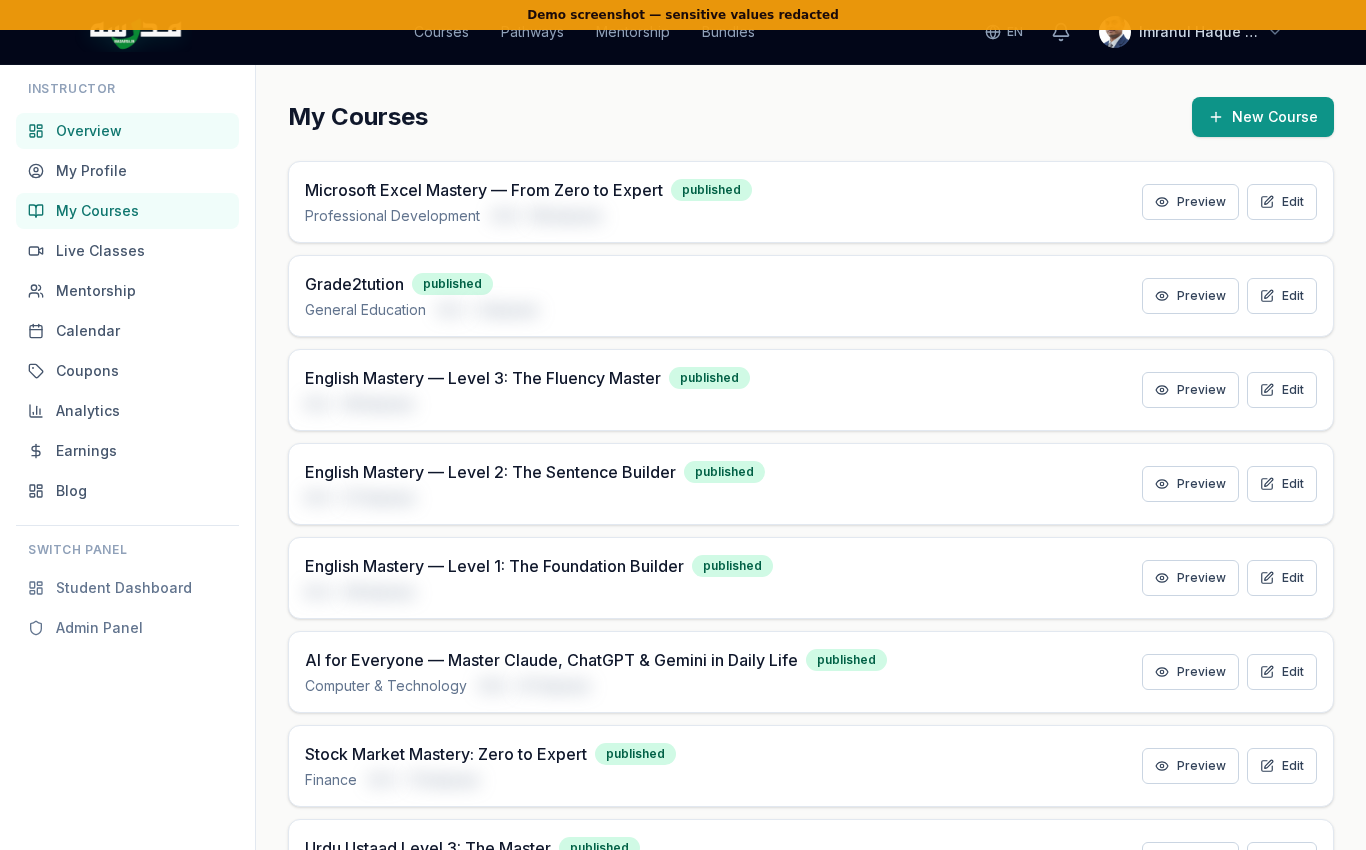
The list shows every course you own — drafts and published. Click + New Course in the top right.
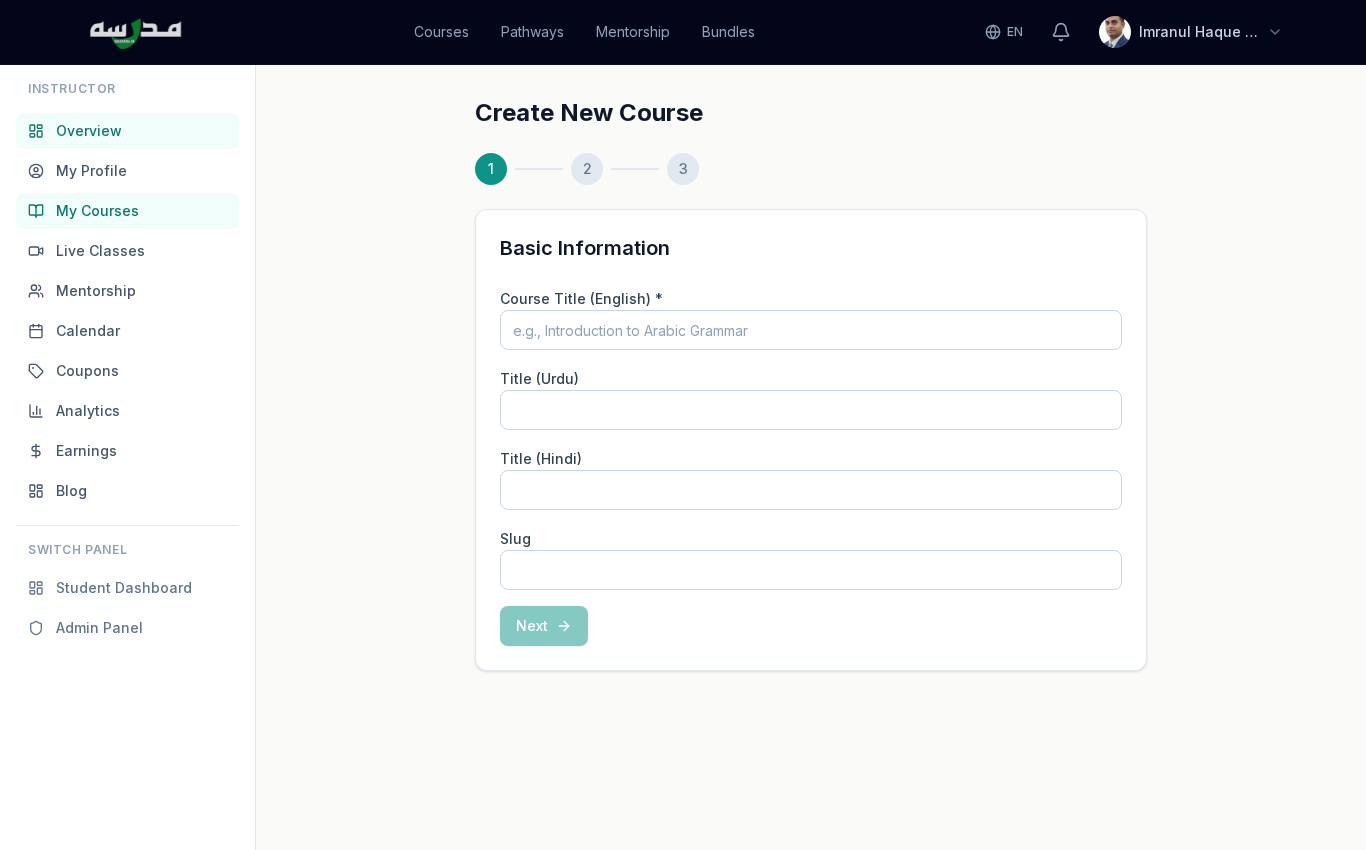
You'll set the basic metadata first: title, slug, primary language, category, difficulty level. Save → you're inside the course editor.
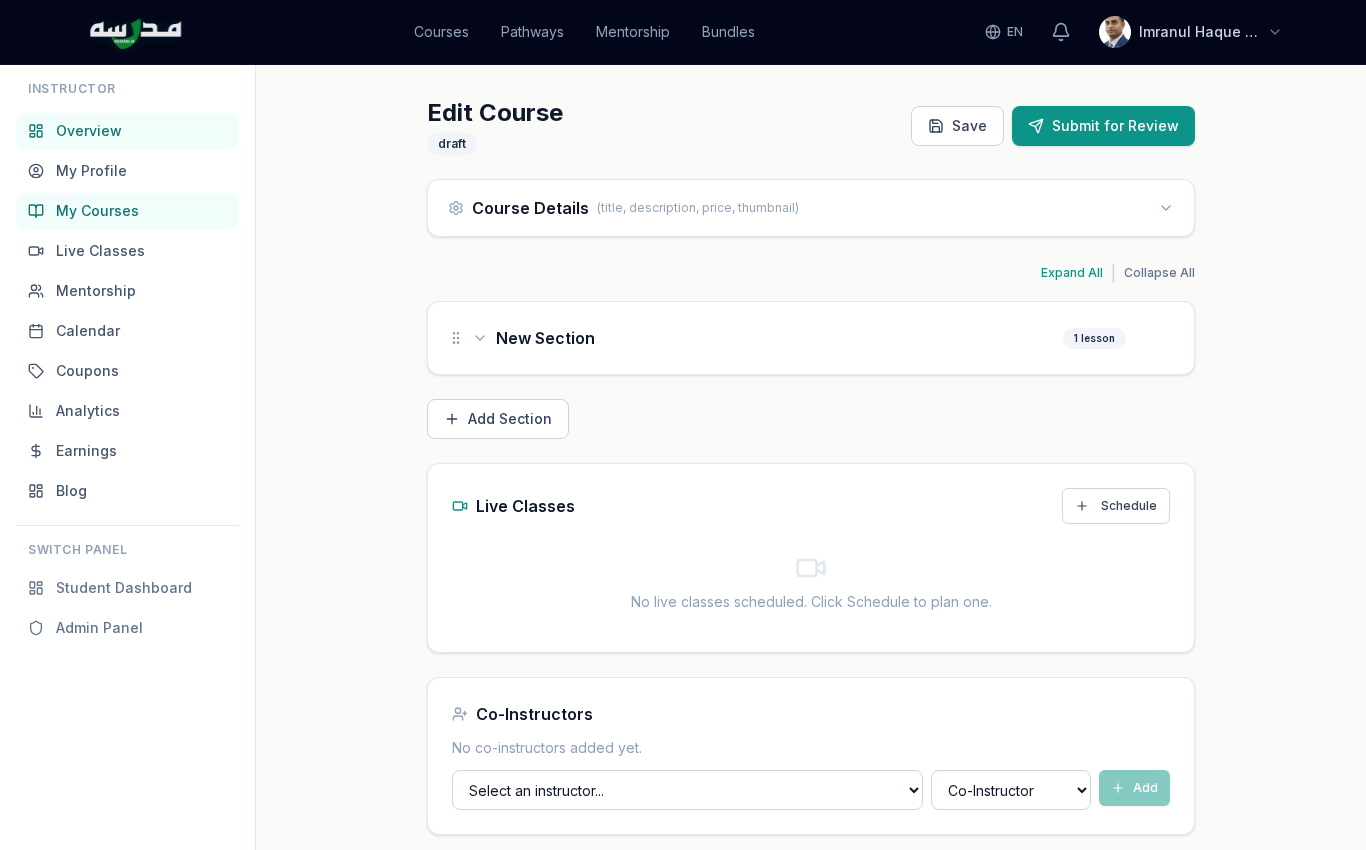
The editor has four big regions:
Course Details
Title (EN/UR/HI), description, tagline, thumbnail upload, original price + selling price (the live discount % shows as you type), language, category, level, language pairs.
Sections + Lessons
Click Add Section, then inside each section click Add Lesson. Each lesson can be Text, Video (URL or upload), Audio, PDF, or a Quiz. Drag to reorder.
Live Classes
Schedule one or more LiveKit video sessions tied to this course. Students enrolled in the course see them in their Live Classes tab.
Co-Instructors
Add another instructor to share authoring or revenue split.
For rich, magazine-style lessons (animated diagrams, tables, SVGs), use the lesson HTML editor — but build the rich content via a Node script, not by pasting into the editor (TipTap will strip your styles). The Madarsa Instructor Guide course explains the pattern in detail.
اردو ترجمہ — Urdu Translation
پانچواں قدم — اپنا پہلا کورس بنائیں:
- سائڈ بار سے My Courses کھولیں۔ یہاں آپ کے سب کورسز کی فہرست ہے — مسودہ اور شائع شدہ دونوں۔
- اوپر دائیں + New Course پر کلک کریں۔ بنیادی معلومات (Metadata) درج کریں — عنوان، سلگ (Slug)، بنیادی زبان، زمرہ، مشکل کی سطح۔ Save دبائیں۔
- اب کورس ایڈیٹر (Course Editor) کھل جائے گا۔ اس میں چار حصے ہیں:
- Course Details: عنوان (انگریزی، اردو، ہندی)، تفصیل، ٹیگ لائن، تھمب نیل (Thumbnail)، اصل قیمت اور فروخت قیمت (لائیو ڈسکاؤنٹ فیصد ساتھ نظر آتا ہے)، زبان، زمرہ، سطح۔
- Sections + Lessons: Add Section دبائیں، اس کے اندر Add Lesson سے لیسن شامل کریں۔ ہر لیسن متن (Text)، ویڈیو (Video — یو آر ایل یا اپلوڈ)، آڈیو (Audio)، پی ڈی ایف (PDF) یا کوئز (Quiz) ہو سکتا ہے۔ ترتیب گھسیٹ کر تبدیل کر سکتے ہیں (Drag to Reorder)۔
- Live Classes: اس کورس سے جڑی ایک یا زیادہ لائیو ویڈیو کلاسز شیڈول کریں۔ کورس میں داخل طلباء کو وہ ان کی Live Classes ٹیب میں نظر آتی ہیں۔
- Co-Instructors: کسی اور استاد کو شراکت دار بنائیں — مواد لکھنے یا آمدنی تقسیم کرنے کے لیے۔
اہم نوٹ: اگر آپ بھرپور (Rich) لیسن بنانا چاہتے ہیں — ساتھ متحرک خاکے، ٹیبلز یا ایس وی جی (SVG) — تو ٹِپ ٹیپ (TipTap) ایڈیٹر میں براہ راست پیسٹ نہ کریں، یہ کسٹم کلاسز ہٹا دیتا ہے۔ نوڈ اسکرپٹ (Node Script) کے ذریعے کورس بنائیں۔ مدرسہ کا "Instructor Guide" کورس اس طریقے کی تفصیل دیتا ہے۔
🎥 Step 6 — Run a Live Class
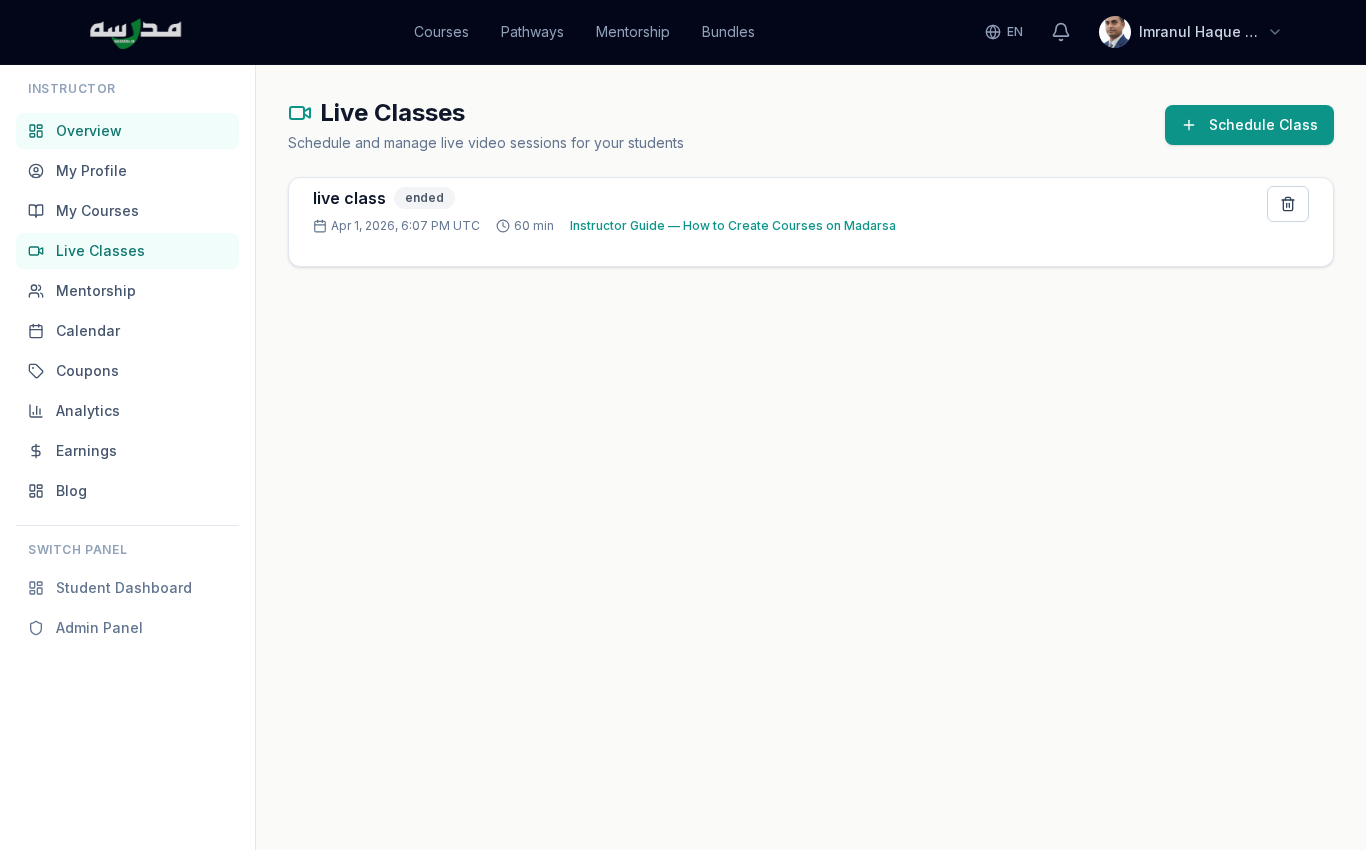
Click Schedule Class. You'll set: title, date & time, duration (minutes), the course this class is tied to (or leave standalone), and an optional description.
When the class starts, both you and your students click Join. The platform uses LiveKit under the hood — instructors can share screen, enable/disable student cameras, and grant screen-share to students. Sessions are not recorded by default — ask before recording.
Send a reminder note inside the course feed 24 hours before the class. Madarsa also auto-emails enrolled students at 1 hour and 9 minutes before start.
اردو ترجمہ — Urdu Translation
چھٹا قدم — لائیو کلاس چلائیں (Run a Live Class): سائڈ بار سے Live Classes کھولیں۔ Schedule Class دبائیں اور یہ معلومات بھریں: عنوان (Title)، تاریخ اور وقت (Date & Time)، دورانیہ (Duration in Minutes)، یہ کلاس کس کورس سے جڑی ہے (یا اسٹینڈ الون رکھیں)، اور اختیاری تفصیل (Description)۔
کلاس شروع ہونے پر آپ اور طلباء دونوں Join دبائیں گے۔ پلیٹ فارم لائیو کِٹ (LiveKit) استعمال کرتا ہے — استاد اسکرین شیئر (Screen Share) کر سکتا ہے، طلباء کے کیمرہ (Camera) آن یا آف کر سکتا ہے، اور طلباء کو اسکرین شیئرنگ کی اجازت دے سکتا ہے۔ سیشنز ڈیفالٹ پر ریکارڈ (Record) نہیں ہوتے — ریکارڈ کرنے سے پہلے اجازت لیں۔
تجویز: کلاس سے ۲۴ گھنٹے پہلے کورس فیڈ (Course Feed) میں یاد دہانی پوسٹ کریں۔ مدرسہ خود بخود طلباء کو ایک گھنٹہ اور نو منٹ پہلے ای میل بھی بھیجتا ہے۔
🤝 Step 7 — Set up 1:1 Mentorship
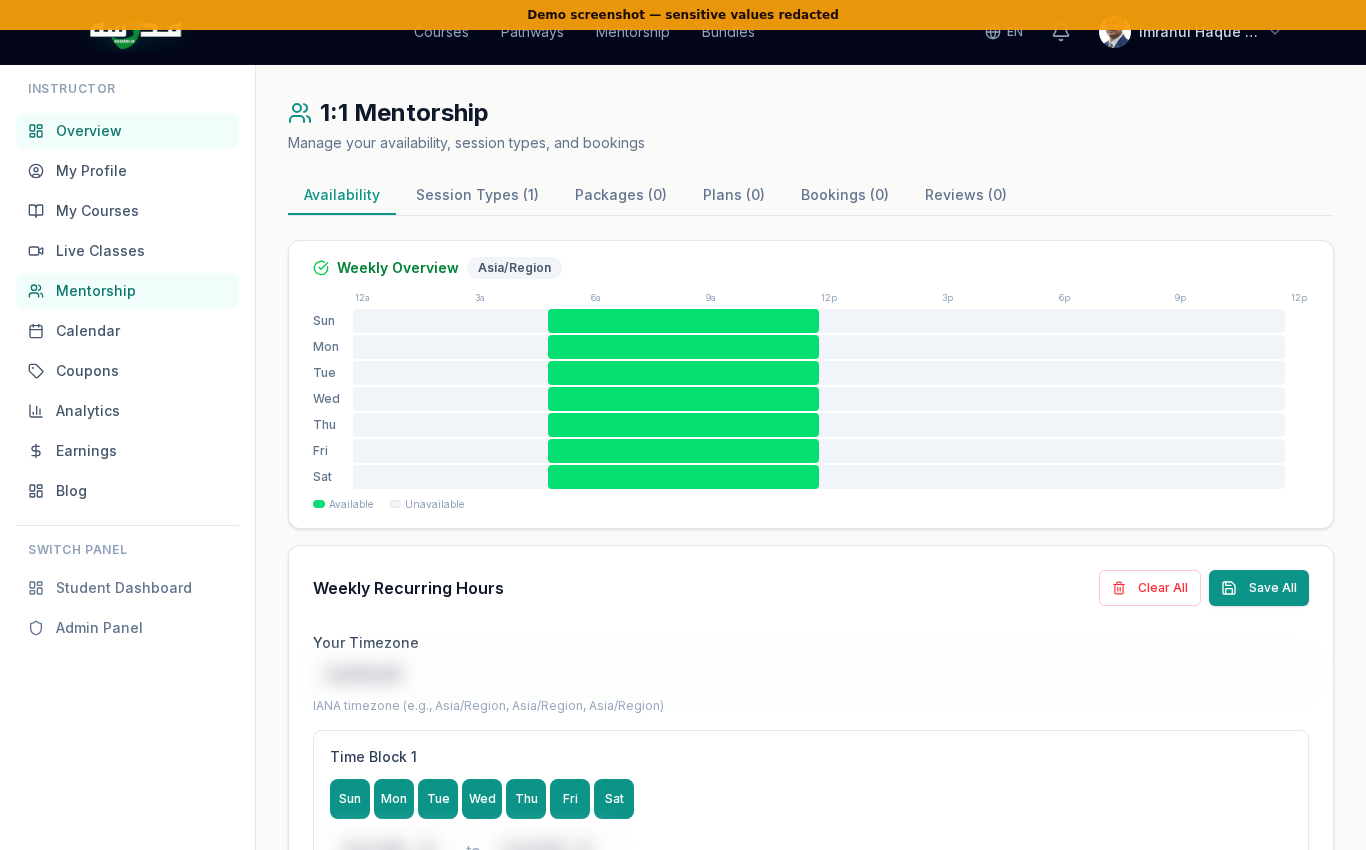
Mentorship is the booking-based 1:1 video session feature — students see your profile, pick a slot, pay, and meet you on a private LiveKit room. Six tabs:
Availability
Set the timezone and recurring weekly time blocks — "Mon–Fri 5–9pm", "Sun 11am–1pm". The weekly heatmap at the top is computed from these blocks.
Session Types
Define what students can book — e.g. "30-minute career chat — ₹500", "60-minute Quran tajweed coaching — ₹1200". Each session type has its own duration, price, and description.
Packages
Bundle multiple sessions for one payment — "4 × 30-min sessions for ₹1500". Students get session credits they can spend over time.
Plans
Monthly subscriptions — fixed quota per month, pause/resume/cancel. Useful for ongoing tutoring.
Bookings
All upcoming and past bookings live here. Reschedule, cancel, mark no-show.
Reviews
Student reviews of your sessions — visible on your public mentor profile.
Once you have an availability + at least one session type set, your public mentor profile goes live:
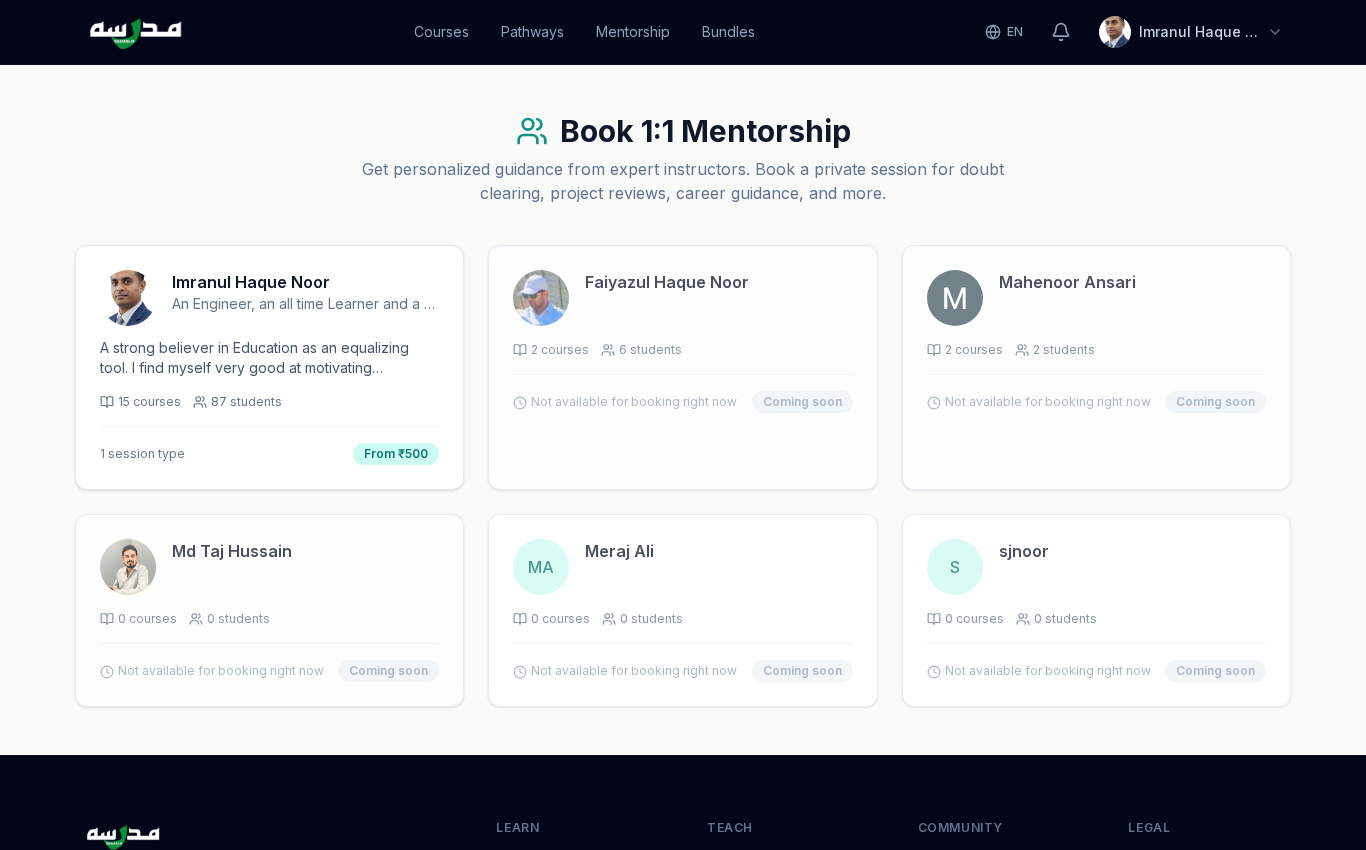
اردو ترجمہ — Urdu Translation
ساتواں قدم — مینٹرشپ (1:1 Mentorship) ترتیب دیں: یہ بکنگ پر مبنی ون آن ون ویڈیو سیشن (1:1 Video Session) فیچر ہے — طلباء آپ کی پروفائل دیکھتے ہیں، ٹائم سلاٹ منتخب کرتے ہیں، ادائیگی کرتے ہیں، اور لائیو کِٹ کے نجی روم (Private Room) میں آپ سے ملتے ہیں۔ چھ ٹیب ہیں:
- Availability: ٹائم زون (Timezone) سیٹ کریں اور ہفتہ وار وقت کے بلاکس (Weekly Time Blocks) درج کریں۔ اوپر ہفتہ وار ہیٹ میپ (Heatmap) آپ کے فارغ گھنٹے دکھاتا ہے۔
- Session Types: طے کریں کہ طلباء کیا بک کر سکتے ہیں — جیسے "۳۰ منٹ کیریئر چیٹ — ۵۰۰ روپے"، "۶۰ منٹ تجوید کوچنگ — ۱۲۰۰ روپے"۔ ہر سیشن ٹائپ کا اپنا دورانیہ، قیمت اور تفصیل۔
- Packages: ایک ادائیگی میں متعدد سیشنز کا بنڈل — مثلاً "۴ × ۳۰ منٹ سیشن، ۱۵۰۰ روپے میں"۔ طالب علم کو سیشن کریڈٹ (Session Credits) ملتے ہیں جو وہ بعد میں استعمال کرے۔
- Plans: ماہانہ سبسکرپشن (Monthly Subscription) — ہر ماہ ایک طے شدہ کوٹا (Quota)، پاز/ری زیوم/کینسل (Pause/Resume/Cancel) کی سہولت۔ مسلسل ٹیوشن کے لیے بہترین۔
- Bookings: تمام آنے والی اور گزری ہوئی بکنگز۔ ری شیڈول (Reschedule)، کینسل (Cancel)، نو شو (No-show) مارک کر سکتے ہیں۔
- Reviews: آپ کی سیشنز پر طلباء کے ریویوز — آپ کی عوامی مینٹر پروفائل پر نظر آتے ہیں۔
جیسے ہی Availability اور کم از کم ایک Session Type سیٹ ہو جاتا ہے، آپ کی مینٹر پروفائل عوامی صفحہ /mentors پر لائیو ہو جاتی ہے۔
🎟️ Step 8 — Create coupons for your courses
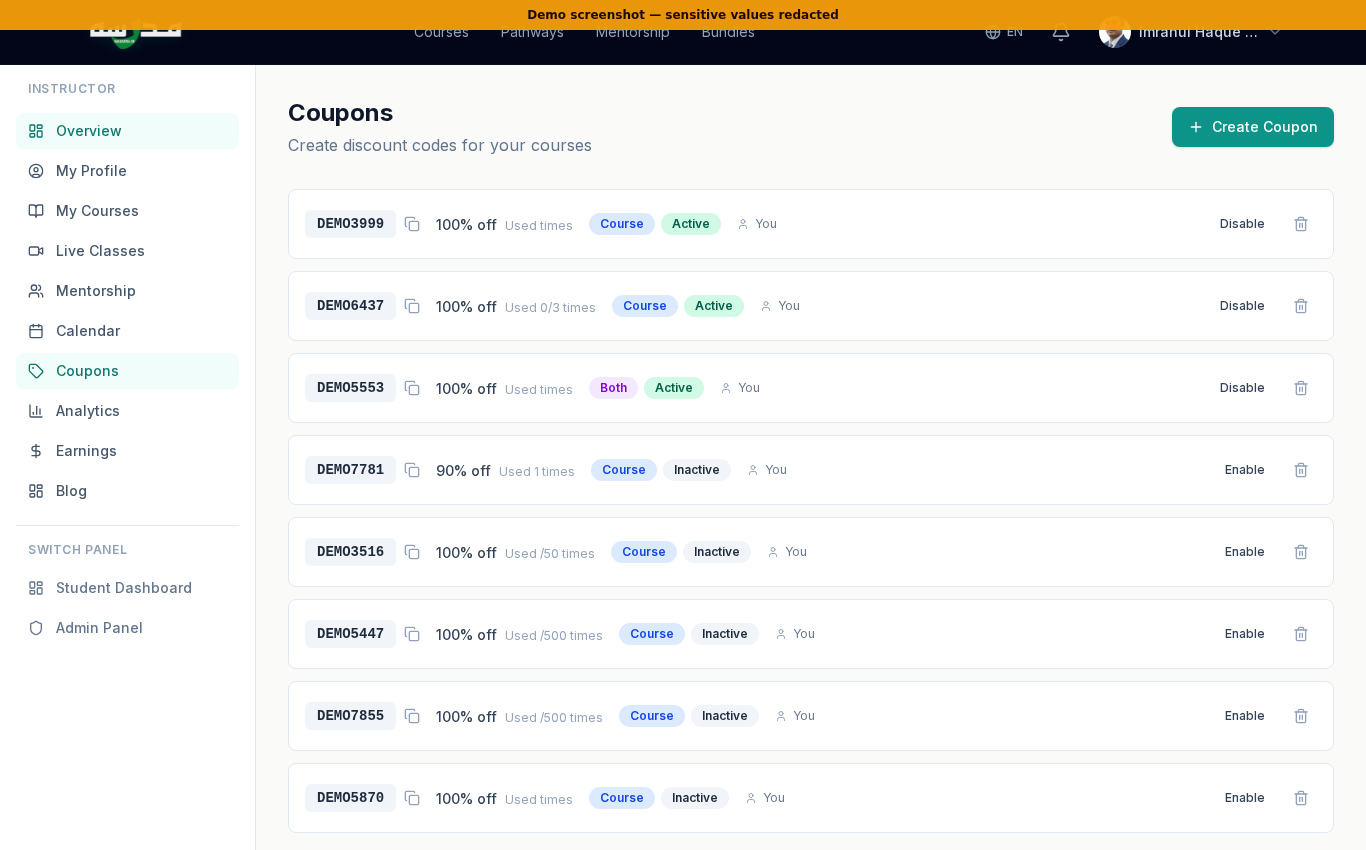
Coupons are powerful for launches and student communities. Common patterns:
🚀 Launch coupon
100% off for the first 50 students. Lets you build word-of-mouth fast and collect early reviews.
👥 Community coupon
30% off for students from a specific WhatsApp group. Track adoption via the per-coupon usage counter.
⏰ Time-bound coupon
20% off, valid 7 days. Creates a deadline-driven decision. Pair with email reminders.
🏫 Bulk-class coupon
Free enrolment with a code your offline students enter. Lets your in-person class continue learning online.
اردو ترجمہ — Urdu Translation
آٹھواں قدم — اپنے کورسز کے لیے کوپن (Coupon) بنائیں: سائڈ بار سے Coupons کھولیں۔ یہاں آپ اپنے کسی بھی کورس کے لیے کوپن کوڈ بنا سکتے ہیں — مقررہ رقم (Fixed Amount) یا فیصد (Percentage)، اختیاری معیاد (Expiry)، زیادہ سے زیادہ استعمال (Max Uses) اور کم از کم خرید کی رقم (Minimum Amount) کے ساتھ۔ عام پیٹرن:
- لانچ کوپن (Launch Coupon): پہلے ۵۰ طلباء کے لیے ۱۰۰٪ مفت — تاکہ ابتدائی ریویوز اور زبانی شہرت ملے۔
- کمیونٹی کوپن (Community Coupon): کسی واٹس ایپ گروپ کے ممبران کے لیے ۳۰٪ رعایت۔ کوپن کے فی استعمال کاؤنٹر سے کارکردگی دیکھیں۔
- وقتی کوپن (Time-bound Coupon): ۲۰٪ رعایت، ۷ دن کی معیاد — وقت کی پابندی فیصلہ کرواتی ہے۔ ای میل یاد دہانیوں کے ساتھ ملا کر استعمال کریں۔
- کلاس کوپن (Class Coupon): آف لائن طلباء کے لیے ۱۰۰٪ مفت — تاکہ آپ کی روایتی کلاس آن لائن بھی جاری رہے۔
💰 Step 9 — Track earnings & get paid
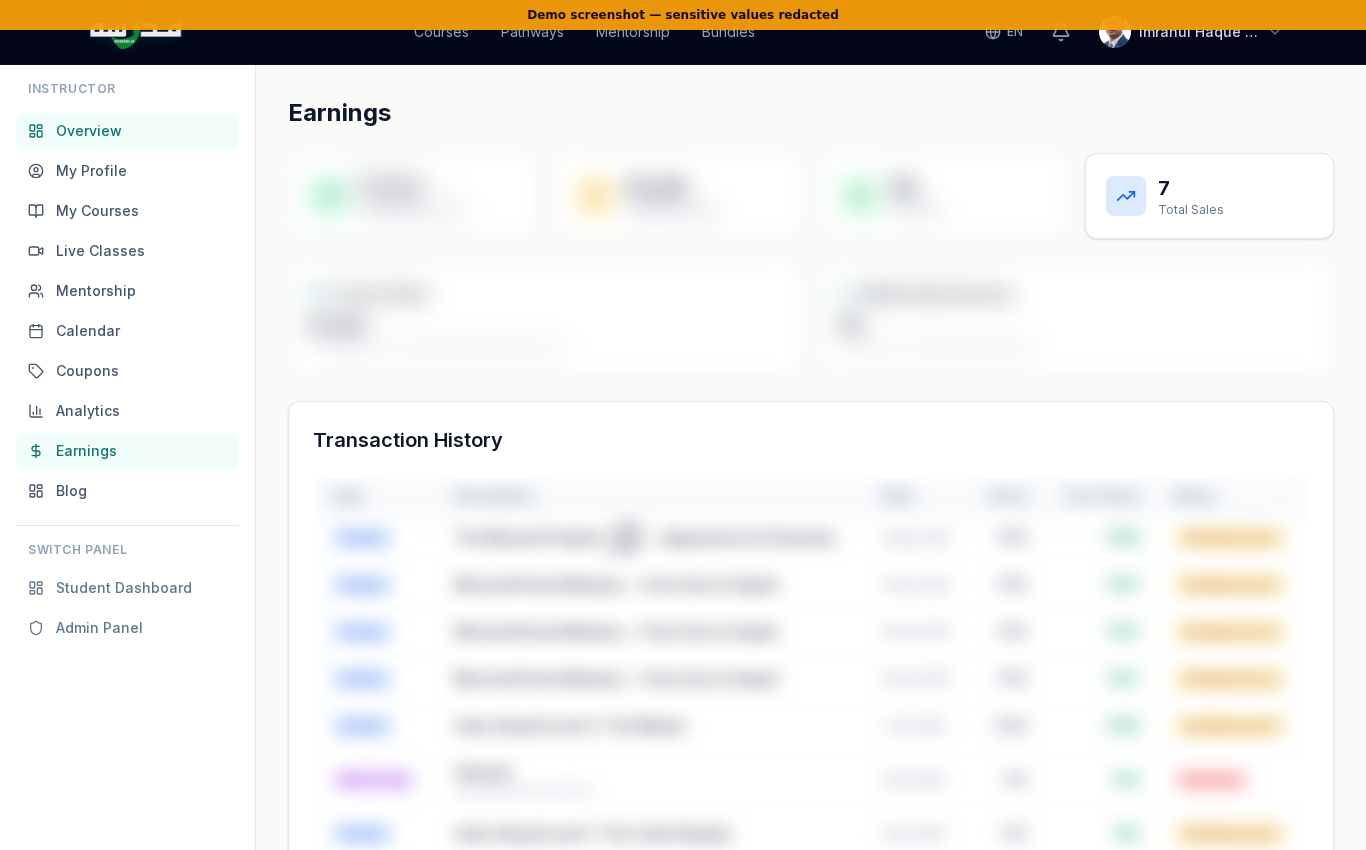
Madarsa's payout model:
- You earn 85% of net revenue from each enrolment (after payment-gateway fees and applicable GST).
- Payouts run monthly to the bank account configured under Payout Settings. Update bank details there before your first payout.
- Coupon-driven discounts are deducted from your share — i.e. if you give 50% off, your 85% applies to the discounted price.
- Free courses do not generate revenue but still count toward Total Students and earn you ratings.
Add UPI ID + PAN + bank account in Payout Settings on Day 1 — payouts are paused until KYC is complete.
اردو ترجمہ — Urdu Translation
نواں قدم — آمدنی دیکھیں اور ادائیگی پائیں (Earnings & Payouts): سائڈ بار سے Earnings کھولیں۔ یہاں آپ کی کل آمدنی (Total Revenue)، اس ماہ کی کمائی (This Month's Earnings)، لائف ٹائم ادائیگیاں (Lifetime Payouts)، فی کورس تقسیم اور ادائیگی کی بینک تفصیلات (Bank Details) ملتی ہیں۔
مدرسہ کا ادائیگی ماڈل:
- ہر داخلے کی ۸۵٪ خالص آمدنی (Net Revenue) آپ کو ملتی ہے، ادائیگی گیٹ وے فیس اور قابل اطلاق جی ایس ٹی (GST) کے بعد۔
- ماہانہ ادائیگیاں آپ کے Payout Settings میں موجود بینک اکاؤنٹ پر بھیجی جاتی ہیں۔ پہلی ادائیگی سے پہلے بینک تفصیلات ضرور بھریں۔
- کوپن کی رعایت آپ کے حصے سے کٹتی ہے — یعنی اگر آپ ۵۰٪ رعایت دیتے ہیں تو ۸۵٪ اسی کم قیمت پر بنتی ہے۔
- مفت کورسز سے آمدنی نہیں ہوتی، مگر کل طلباء کی گنتی اور ریٹنگ میں شامل ہوتے ہیں۔
اہم: پہلے دن ہی Payout Settings میں یو پی آئی آئی ڈی (UPI ID)، پی اے این (PAN)، اور بینک اکاؤنٹ شامل کر دیں — کے وائی سی (KYC) مکمل ہونے تک ادائیگیاں رکی رہتی ہیں۔
🏆 Tips for new instructors
Start with one tight course
One ₹149 course completed end-to-end is more valuable than four half-finished courses. Ship narrow, iterate.
Bilingual = double reach
Even a 60% translation of each lesson into Urdu doubles your audience. Use the AI tutor as a draft-translation helper.
Use a launch coupon
Drop a 100%-off coupon to your first 50 students. Their reviews + completion rates open paid traffic.
Schedule weekly live Q&A
One 60-minute live class per week dramatically lifts course completion. Pin the Zoom-style classroom in the course feed.
Open mentorship slots
Even one 30-minute slot per week starts producing bookings within a month. The students who book turn into your strongest reviews.
Write one blog post
Submit one bilingual article to the Madarsa magazine. It ranks for your topic over time and brings free traffic to your courses.
اردو ترجمہ — Urdu Translation
نئے اساتذہ کے لیے مشورے:
- ایک مضبوط کورس سے شروع کریں: ایک ۱۴۹ روپے کا کورس مکمل کر دینا چار ادھورے کورسز سے زیادہ قیمتی ہے۔ چھوٹا، تنگ دائرہ، مکمل (Ship Narrow, Iterate)۔
- دو لسانی = دگنی رسائی: ہر لیسن کا ۶۰٪ بھی اردو میں ترجمہ کر دیں تو سامعین دوگنے ہو جاتے ہیں۔ مسودے کے لیے اے آئی ٹیوٹر (AI Tutor) سے مدد لیں۔
- لانچ کوپن استعمال کریں: پہلے ۵۰ طلباء کو ۱۰۰٪ رعایت دیں۔ ان کے ریویوز اور تکمیل کا تناسب پیڈ ٹریفک (Paid Traffic) کا دروازہ کھولتا ہے۔
- ہفتہ وار لائیو سوال جواب (Live Q&A): ہفتے میں ایک گھنٹے کی لائیو کلاس کورس مکمل کرنے کا تناسب کافی بڑھا دیتی ہے۔ کلاس روم لنک کورس فیڈ میں پن (Pin) کر دیں۔
- مینٹرشپ سلاٹ کھولیں: ہفتے میں صرف ایک ۳۰ منٹ کا سلاٹ بھی ایک ماہ میں بکنگز پیدا کرنے لگتا ہے۔ یہ طلباء آپ کے سب سے مضبوط ریویوز بنتے ہیں۔
- ایک بلاگ پوسٹ لکھیں: مدرسہ میگزین (Magazine) کے لیے ایک دو لسانی مضمون جمع کرائیں۔ وقت کے ساتھ یہ سرچ پر آتا ہے اور آپ کے کورسز کو مفت ٹریفک دیتا ہے۔
❓ Common questions
Can I teach in Urdu only?
Yes. Set the course primary language to Urdu and ignore the English fields. Your course will be discoverable in the Urdu catalogue and shown in Nastaliq.
Do I need a YouTube channel?
No. You can host videos directly inside Madarsa or paste any video URL. A YouTube channel just helps with off-platform reach.
How long until my first payout?
Once your bank details are verified, monthly payouts begin the month after your first paid enrolment. There is a small minimum threshold (₹500) — anything below rolls into next month.
Can I keep teaching at my offline madarsa or institute?
Yes. Madarsa instructors are not employees — you keep all your other engagements. Many instructors use Madarsa to scale their offline class to online students.
Who owns the course content?
You. Madarsa has a non-exclusive license to distribute on the platform. You can also publish the same content elsewhere.
اردو ترجمہ — Urdu Translation
عام سوالات:
- کیا میں صرف اردو میں پڑھا سکتا ہوں؟ — جی ہاں۔ کورس کی بنیادی زبان اردو رکھیں اور انگریزی فیلڈز نظر انداز کر دیں۔ کورس اردو کیٹلاگ میں دستیاب ہوگا اور نستعلیق میں دکھائی دے گا۔
- کیا یوٹیوب چینل (YouTube Channel) ضروری ہے؟ — نہیں۔ آپ ویڈیوز سیدھے مدرسہ پر اپلوڈ (Upload) کر سکتے ہیں یا کسی بھی ویڈیو کا یو آر ایل پیسٹ کر سکتے ہیں۔ یوٹیوب چینل صرف پلیٹ فارم کے باہر رسائی بڑھاتا ہے۔
- پہلی ادائیگی (First Payout) کب ملتی ہے؟ — بینک تفصیلات (Bank Details) تصدیق ہوتے ہی پہلے ادا شدہ داخلے کے اگلے ماہ سے ماہانہ ادائیگیاں شروع ہو جاتی ہیں۔ ایک کم سے کم حد (۵۰۰ روپے) ہے — اس سے کم رقم اگلے ماہ میں شامل ہو جاتی ہے۔
- کیا میں اپنے آف لائن مدرسے یا انسٹیٹیوٹ میں پڑھاتا رہ سکتا ہوں؟ — جی ہاں۔ مدرسہ کے اساتذہ ملازم (Employees) نہیں ہیں — آپ کی دیگر مصروفیات آزاد ہیں۔ بہت سے اساتذہ مدرسہ کا استعمال اپنی آف لائن کلاس کو آن لائن طلباء تک پھیلانے کے لیے کرتے ہیں۔
- کورس کے مواد کا مالک کون ہے؟ — آپ۔ مدرسہ کو غیر خصوصی لائسنس (Non-exclusive License) حاصل ہے کہ پلیٹ فارم پر تقسیم کرے۔ آپ یہی مواد دوسری جگہ بھی شائع کر سکتے ہیں۔
🎬 Video walkthrough
🌱 Closing
Teaching online used to require a video studio, a marketing team, and a payment gateway. Now it requires a clear voice and one tight course. The first ten students are the hardest to find; the next thousand follow them. Bismillah — start today.
Last updated: 2026-05-09. Screenshots from the live madarsa.in instructor panel. UI may evolve — the steps remain the same.
Enjoyed this article?
Subscribe to our newsletter for more articles, tutorials, and insights delivered straight to your inbox.